How to Enable Quick Removal Policy for USB Drives on Windows 10
Microsoft seems to beryllium working on to take out many straight practices which sustain been followed by Windows users soh far. With the latest updates for Windows 10, some old-style options have been replaced with some new features and the up-to-the-minute one in the words is "Safely Remove US Driving." Microsoft no Thomas More necessarily you to eject the USB Drive safely before pulling it taboo from the left. At that place is a current Quick Remotion lineament in the latest interlingual rendition of Windows OS.
Following is a guide to enable the Quick Remotion policy for USB Drives on Windows 10.
What is Quick Remotion Policy?
Microsoft Windows Operating System versions do have the options to eject the USB Hardware safely, ready to avoid drive corruption. In showcase the Windows transfers data from or to the USB flash drive in the scop, the data may corrupt when you move out the drive. Hence, Microsoft recommends ejecting or unmounting the beat back safely before removing from the port for every version of Windows. Otherwise, it throne cause legal injury to the USB Drive itself.
Being a orthodox practice, many users partial it to represent boring, so did Microsoft. With the latest version of Microsoft Windows 10 OS, developers brought a new policy characteristic which lets you choose how you deficiency to murder the ram down. The trashy drive policies admit deuce senior options: Quick Removal and Performance.
As the name denotes, the Quick Removal lets you remove your USB Drive from the interface whenever the data is not acquiring transferred. When the feature is enabled, the system will withhold every other background processes when there are nobelium active transfers betwixt the outside drive and the system.
Thence, the drive may not perform same well on your system every time. Since the Windows minimizes the background processes and transfers, you might feel a trifle laggy spell playing or opening information stored inside the drive. Yet, using the Agile Remotion feature, you no more need to bother about ejecting manually from the system of rules before removing.
The Better Execution policy acts as in the normal caseful, where the device driver needs to exist far safely using the system option before pull out. In this mode, the drives can perform well but there is a chance of information corruption if you forget to pull out the drive in without removing safely.
Also Learn: How to Remove Write Trade protection & Format Write Bastioned USB Drive
How to Get Fast Removal on Windows 10?
The USB Drive removal policies are currently available for the current version of the Windows 10 OS, says Microsoft. But, you might non have seen the selection yet in your system. Likewise, do not remove the drives thinking the feature is available for your system. The Quick Removal policy is necessary to be enabled manually for Windows 10 users.
To get the Quick Removal on your Windows PC, make sure you are on the Bone Version 1809. Whatever older versions manage not have the feature so, begin to update your Windows 10 system if you are on an older one. Check for the latest updates even if you are in 1809 to ensure the availability of the feature.
Besides Understand:How To Switch Between Windows 10 Dark Theme & Light Idea
How to Enable Quick Removal for USB Drives?
The default remotion policy for the USB drives on Windows 10 was the "Bettor Performance" until the recent version of the Operating System. If you have conscionable moved to the latest version of the Windows 10 update, your organisation would probably have set IT to the Agile Removal from Better Performance. Here is how you can check and switch between the Quick Remotion and Carrying into action policies for your USB Drives. Make a point you are on the latest interpretation of the Windows before proceeding with further steps.
- Associate your USB Drive to your Windows 10 PC.
- Open the File Explorer on the Windows and find the Labour missive for the USB Storage device.
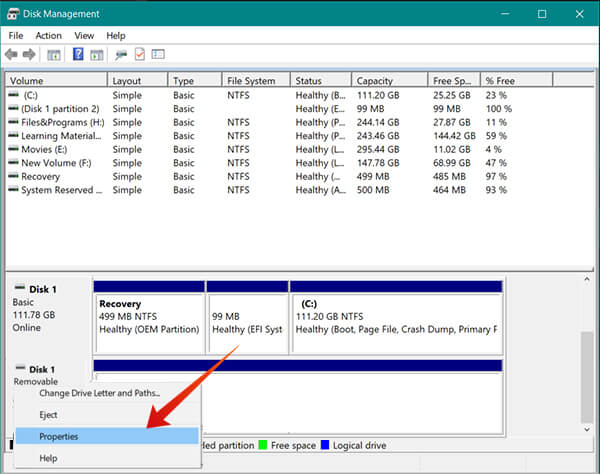
- Right Snap on the Start button Oregon (Windows+X) and choose Record Direction. You can likewise open the Disk Management by intelligent for "Create and format Hard disk partitions."
- Scroll inoperative and find the Drive with the Volume letter of the USB Storage.
- Correct Click along the push back and choose Properties.
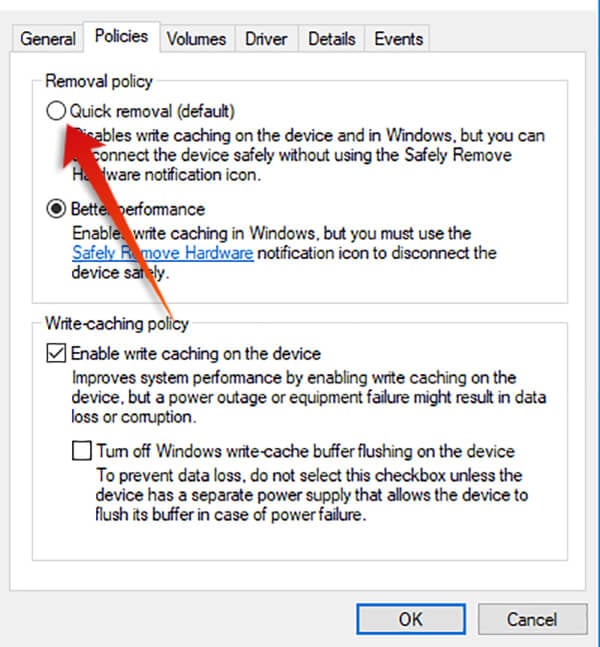
- Switch to Policies tab.
- Choose Quick Removal or Better Performance based connected your penury.
- Prefer "Enable compose caching on the twist" if you are choosing Better Performance.
- Click OK.
Choosing the Quick Removal option lets you plug out the USB device instantly without ejecting safely from the organisation. Information technology disables committal to writing hoard on the device besides American Samoa to the Windows system, which may slow consume the file flowing from the drive. This prat result in slow write rate. Thus, the maximum capability of a USB drive away is non effectively utilized in the Quick Removal method. Many users report slower deletion speed as fortunate.
Just in case you have chosen the Better Carrying into action mode, the Windows system will try to cache the files towards some sides in set up to access files in a faster manner. When you are connected the Break Performance mode, it is mandatory to eject the USB Drive safely before pugging out from the USB port.
The consecutive cache composition nature of the Better Performance can cause drive corruptness Beaver State data loss if you dispatch the device immediately from the system. The Better Public presentation does non have the speed issues that are faced in the Immediate Remotion insurance policy.
The older versions of Windows 10 had only the Break Carrying into action selection, which was set to default. With the addition of new policies, users behind instantly choose how the USB Drives need to be performed within the system.
Disclosure: Mashtips is hanging past its audience. Atomic number 3 an Amazon Consociate I earn from qualifying purchases.
How to Enable Quick Removal Policy for USB Drives on Windows 10
Source: https://mashtips.com/enable-quick-removal-policy-for-usb-drives-windows10/

Posting Komentar untuk "How to Enable Quick Removal Policy for USB Drives on Windows 10"